Difficulty Level: Easy
Project Length: Quick
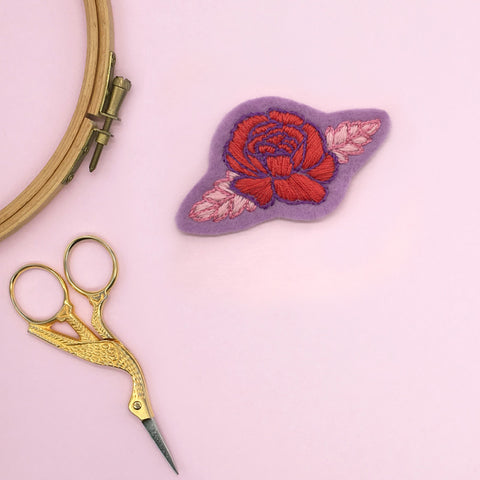
To stitch this hand embroidered patch you will need:
- Lazy May 'Fab Flowers' embroidery pattern set (transfer )
- 20cm x 20cm (8" x 8") light purple wool mix felt. IMPORTANT: do not use craft felt as it will melt if you iron it.
- DMC thread in the following colours; light pink 225, dark pink 760, purple 327, red 349
- small embroidery hoop, 5" or 6"
- embroidery stabliser
-
Needle, Scissors
If you are new to embroidery you can find a guide to the basics, including equipment and getting setting up here. You will find guides to all the stitches mentioned in this pattern here .
Preparation
I find it easier to stitch felt with embroidery stabiliser attached, so before you start take your embroidery stabiliser and place it shiny side down on the felt, press with a hot iron to stick the stabiliser to the fabric.
Next transfer your pattern to the felt, follow the pack instructions to cut out and transfer the rose design to the felt. When transferring to felt do not slide the iron over the transfer, stamp it down vertically and hold it in place for 5 seconds. Once transferred clamp your felt and attached stabiliser in the hoop.
You will see that the transferred lines appear light grey in colour, as show below.

Stitching Notes

1. Start with stitching the outline of the leaves. Cut an arms length of the bright pink thread and separate 4 of the six strands by untwisting the thread (if you are new to embroidery and have not done this before you will find more instructions in my beginners embroidery guide).
Thread your needle with the 4 strands and tie an knot in the other end. Now begin to stitch over the pattern line of the leaves using split stitch (click here for a guide to split stitch). With all the stitches in this pattern keep the stitches small and tight.
2. Now move on to the filling in the leaves, each leaf is completed in the same way. Fill in each segment of the leaf using 3 strands of the pale pink thread and satin stitch (click here for a guide to satin stitch). In each segment work from point end to pointy end placing your stitches in the direction shown below, although be sure to place them close together so no fabric shows though.

3. Next stitch the outline of the rose. Cut an arms length of the purple thread and separate 3 of the six strands by untwisting the thread, stitch along the pattern line using stem stitch (click here for a guide to split stitch).
4. Finally, fill in the rose petals, take 4 strands of the red thread and begin to fill in each petal using satin stitch (click here for a guide to satin stitch). Place you stitches in the direction you imagine the petal lies, you can see what I mean by this in the illustration below.

5. Once you have stitched the petals, carefully tear away the embroidery stabiliser, press down on the stitches with your thumb as you tear the stabiliser, this will ensure the stitches don't get pulled out of shape.
6. Finally trim around the patch leaving a gap of around 5mm or 1/4".
And thats it, all done, you can now sew your patch on to a shirt, t-shirt, jeans or a bag.
This patch was created using 'Fab Flowers' transfer pack, click the button below to add it to your cart.


